400 products
Sort by:
400 products


Votre Blooming Gel à utiliser avec les encres gel pour effets aquarelle, fumé et marbré.
Instructions:
-
Appliquez et cuire deux couches de la couleur de votre choix de vernis UV.
- Appliquez l'encre gel de la couleur de votre choix.
-
Appliquez une fine couche de Blooming gel #2, ne pas la cuire !
3. Avec l’outil de votre choix, appliquez la ou les couleurs désirées pour créer l’effet Bloom souhaité.
4. Une fois le motif ou l’effet souhaité atteint, cuire 30 secondes sous une lampe LED
5. Finir la pose avec le Top coat, puis cuire 30 secondes
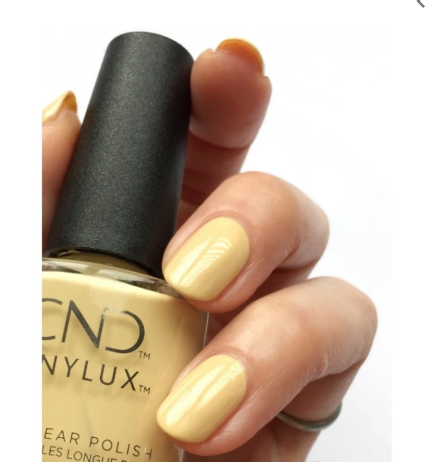
Shellac UV varnish Vagabond 7.3 ml (Boho Spirit #280)
Collection: Boho Spirit 2018
What is Shellac? UV varnish ?
Shellac is a revolutionary patented UV3 technology that combines the ease of nail polish with the durability of UV gel. It applies like nail polish, wears like gel, and removes in minutes.
Why Shellac UV varnish rather than regular varnish?
Shellac will last for more than 14 days depending on the growth of your plate. It is recommended to reapply Shellac after 14 days, as the longer the polish stays on your plate, the more it will adhere and this will make the removal process a little longer.
How to apply Shellac!
The Shellac system consists of a base coat, a color coat, and a top coat. With a UV lamp, the polish stays flawless for up to 2 weeks. Shellac is self-leveling, requires no filing, and can be removed with acetone in 10 minutes.
Is Shellac safe for you?
Removal does not damage the natural plaque. Shellac has been developed and tested for several years to perfect all aspects of the product, including removal.
Shellac is Hypo-allergenic, does not contain Formaldehyde, Toluene or DBP (Dibutyl Phthalate)
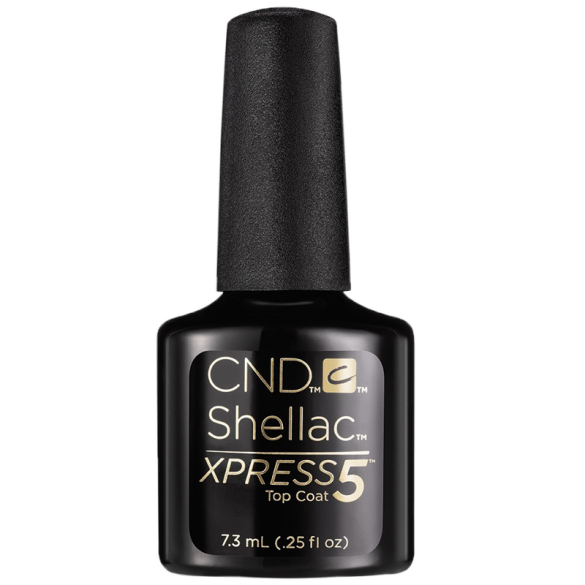
Shellac UV Varnish Xpress 5 Top Coat
CND™ SHELLAC™ XPRESS5™ Top Coat delivers phenomenal wear, stunning crystal-clear shine for 14+ days and removes quickly in 5 minutes! Designed to withstand daily wear and tear!
Benefits of Shellac Xpress 5:
- Compatible with Shellac color varnishes and bases
- Easy application
- Ultra-glossy finish
- Easy Removal: Removes in just 5 minutes and drying time is greatly reduced, making your service even faster!
- No yellowing over time
- Cures under LED or UV lamp
- One coat is enough! It is possible to apply two coats of Top coat, for nail art or for other reasons, but this is not necessary for the product's performance (NB adding a 2nd coat of Xpress 5 top coat will increase the product's removal time).
Shellac Xpress 5 Finish Instructions
- Prepare your nails and remove all traces of dust;
- Use a cotton pad soaked in Scrub Fresh to dehydrate the nail;
- Apply a very thin layer of Shellac Base Coat and cure under a UV/LED lamp*;
- Apply a first layer of Shellac color (thin layer), cure under a UV/LED lamp*;
- Apply a second coat of Shellac color (thin layer), cure for 2 minutes under a UV/LED lamp*;
- Apply one coat of Shellac Xpress 5, cure under a UV/LED lamp*;
- Remove the sticky layer with a swab and alcohol;
- Apply cuticle oil to finish the application!
*Lamp times will vary depending on the model and power of the lamp used.
Shellac Xpress 5 Finish Preservation
Shellac Xpress 5 Finish bottles can be stored at room temperature, preferably away from sunlight.
Warning
May cause an allergic reaction. Avoid contact with skin. Keep out of reach of children.


2 in 1 Gel and Acrylic Brushes, Premium Quality with Crystals
#6. Color may vary between numbers
Black only.

Tip Gel Tip Primer - Base pour Extension 15mL
Base Gel Tip, parfaite pour les poses américaines, pour coller des prothèses avec le système TipGel! Utilisez cette base ainsi que le Tip Adhesive pour coller vos prothèses (faux ongles) et faire cuire avec la lampe 1 doigt LED Touch Cure. Belle alternative pour remplacer la colle résine.
Application
- Après avoir terminé la préparation de la main, appliquer le contrôle pH.
- Choisir les prothèses désirées et déterminer les grandeurs requises.
- Appliquer une couche de Tip Primer sur le bout d'une prothèse (côté cuticule).
- Appliquer une couche de Tip Primer sur toute la surface de l'ongle naturel.
- Appliquer une couche de Tip Gel Adhesive sur le bout de la prothèse (côté cuticule).
- Placer la prothèse sur l'ongle en gardant une pression constante.
- En tenant la prothèse en place, mettre le doigt sous la lampe LED Touch Cure pendant 30 sec.
- Répéter les étapes 3 à 7 pour les autres doigts.
- Appliquer une couleur désirée de vernis gel et faire la finition adaptée au recouvrement choisi.
Conservation du Tip Gel Primer
Les bouteilles de Tip Gel Primer peuvent être conservées à température ambiante, à l'abri du soleil et des sources de chaleur.

Tip Gel Tip Adhesive - Gel Adhésif pour Prothèse 15mL
Gel pour pose américaine. Parfait pour coller des prothèses avec le système TipGel! Idéal pour les personnes allergiques à la résine.
Application
- Après avoir terminé la préparation de la main, appliquer le contrôle pH.
- Choisir les prothèses désirées et déterminer les grandeurs requises.
- Appliquer une couche de Tip Primer sur le bout d'une prothèse (côté cuticule).
- Appliquer une couche de Tip Primer sur toute la surface de l'ongle naturel.
- Appliquer une couche de Tip Gel Adhesive sur le bout de la prothèse (côté cuticule).
- Placer la prothèse sur l'ongle en gardant une pression constante.
- En tenant la prothèse en place, mettre le doigt sous la lampe LED Touch Cure pendant 30 sec.
- Répéter les étapes pour les autres doigts.
- Appliquer une couleur désirée de vernis gel et faire la finition adaptée au recouvrement choisi.
Conservation du Tip Gel Ahesive
Les bouteilles de Tip Gel Adhesive peuvent être conservées à température ambiante, à l'abri du soleil et des sources de chaleur.
Replacement brushes for your OhBlush Gel and Powder bottles.
Pack of 6 brushes (without caps)
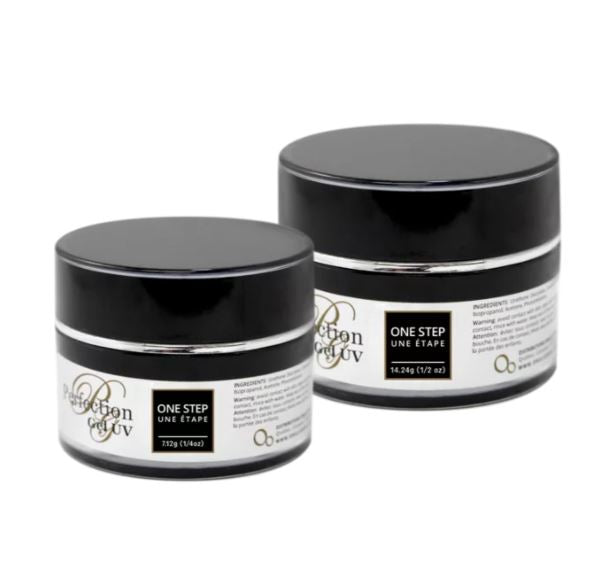
One Step Perfection UV Gel
Medium viscosity clear UV gel that can be used as both a base coat and a glossy top coat! It is self-leveling and non-yellowing.
* The UV gels in the Perfection d'Ongles d'Or range do not release any toxic fumes*
Possibility of melting the application by applying the Perfection Melting Gel as the first layer of the covering.
Instructions for use of Perfection UV gels
- Apply 1 coat of ADHER+ UV PRIMER (cure for 1 minute under a 36W UV lamp);
- Wipe the nail with a clean brush or lint-free pad;
- Apply your choice of CLEAR SCULPT, ONE STEP or PINK SCULPT Perfection Gel
(cook for 2 minutes under a 36W UV lamp); - Repeat steps 2 and 3 to achieve the desired shape;
- Remove stickiness with a lint-free pad and Perfect Cleaner;
- File your nails to a smooth surface and remove any dust.
- Apply 1 coat of Perfect Shine or Fini-Plus and cure under the lamp.
One Step Perfection UV Gel Preservation
One Step Perfection UV gel pots should be stored away from light sources and at room temperature.

Gel UV Perfection Gel Fondant (Perfection Soak Off)
Gel de viscosité medium/claire. Utilisé comme première couche d'un recouvrement de gel UV, le Gel Fondant permet de retirer facilement la pose, car ce dernier fond. Il est auto-nivelant et ne jaunit pas.
* Les gels UV de la gamme Perfection d'Ongles d'Or sont des gels qui ne dégagent aucune vapeur toxique*
Mode d'emploi des gels UV Perfection
- Appliquez 1 couche de ADHER+ UV PRIMER (cuire 1 minute sous une lampe UV 36W);
- Essuyez l’ongle avec un pinceau propre ou un tampon sans charpie;
- Appliquez au choix le gel Perfection CLAIR SCULPT, UNE ÉTAPE ou ROSE SCULPT
(cuire 2 minutes sous une lampe UV 36W); - Répétez les étapes 2 et 3 pour obtenir la forme désirée;
- Retirez l’effet collant avec un tampon sans charpie et le Nettoyeur Parfait;
- Limez vos ongles pour obtenir une surface lisse et retirez la poussière.
- Appliquez 1 couche de Brillance Parfaite ou de Fini-Plus et cuire sous la lampe.
Conservation du gel UV Perfection Gel Fondant
Les pots de gels UV Gel Fondant Perfection doivent être conservés à l'abri des sources lumineuses, à température ambiante.

Golden Nails
Perfection 3 UV Gel Introductory Set
Perfect for technicians already working with UV gel who want to try our brand!
The UV gel kit includes:
- 1 Perfection Fondant Gel (1/4 oz.)
- 1 Clear Sculpt Perfection Gel (1/4 oz.)
- 1 Perfect White Perfection Gel (1/4 oz.)
- 1 Perfect Shine Gel (1/4 oz.)
- 1 Perfect Cleaner (125 mL)
- 1 Adher+ Perfection (UV Primer) Golden Nails (15ml)
- 1 Application step booklet.
* The UV gels in the Perfection d'Ongles d'Or range do not release any toxic fumes*
They are self-leveling and do not yellow.
Possibility of melting the application by applying the Perfection Melting Gel as the first layer of the covering.

Gel UV Perfection Clair Sculpt (Perfect C Clear)
Gel de viscosité épaisse, utilisé pour former le point de stress ou le C de l'ongle. Très polyvalent, il s'utilise pour une pose d'ongles avec des prothèses, avec des formes (chablons) ou sur ongles naturels. Il est auto-nivelant et ne jaunit pas.
* Les gels UV de la gamme Perfection d'Ongles d'Or sont des gels qui ne dégagent aucune vapeur toxique*
Possibitilé de faire fondre la pose en appliquant le Gel Fondant Perfection en première couche du recouvrement.
Mode d'emploi des gels UV Perfection
- Appliquez 1 couche de ADHER+ UV PRIMER (cuire 1 minute sous une lampe UV 36W);Essuyez l’ongle avec un pinceau propre ou un tampon sans charpie;
- Appliquez au choix le gel Perfection CLAIR SCULPT, UNE ÉTAPE ou ROSE SCULPT
(cuire 2 minutes sous une lampe UV 36W); - Répétez les étapes 2 et 3 pour obtenir la forme désirée;
- Retirez l’effet collant avec un tampon sans charpie et le Nettoyeur Parfait;
- Limez vos ongles pour obtenir une surface lisse et retirez la poussière.
- Appliquez 1 couche de Brillance Parfaite ou de Fini-Plus et cuire sous la lampe.
Conservation du gel UV Perfection Clair Sculpt
Les pots de gels UV Perfection Clair Sculpt doivent être conservés à l'abri des sources lumineuses, à température ambiante.

Perfect Shine Gel 1/4 oz
Golden Nails Product

Gel UV Perfection Blanc Parfait (Perfect White)
Gel de viscosité claire, utilisé pour créer un sourire très blanc (french manucure) en 1 ou 2 couches seulement. Puisqu'il est très pigmenté, il est très important de l'appliquer en très minces couches. Il est auto-nivelant et ne jaunit pas.
N.B. le gel Perfection Blanc Parfait est trop liquide pour réaliser des extensions avec des chablons.
* Les gels UV de la gamme Perfection d'Ongles d'Or sont des gels qui ne dégagent aucune vapeur toxique*
Possibitilé de faire fondre la pose en appliquant le Gel Fondant Perfection en première couche du recouvrement.
Mode d'emploi des gels UV Perfection
- Appliquez 1 couche de ADHER+ UV PRIMER (cuire 1 minute sous une lampe UV 36W);
- Essuyez l’ongle avec un pinceau propre ou un tampon sans charpie;
- Appliquez au choix le gel Perfection CLAIR SCULPT, UNE ÉTAPE ou ROSE SCULPT
(cuire 2 minutes sous une lampe UV 36W); - Répétez les étapes 2 et 3 pour obtenir la forme désirée;
- Retirez l’effet collant avec un tampon sans charpie et le Nettoyeur Parfait;
- Limez vos ongles pour obtenir une surface lisse et retirez la poussière.
- Appliquez 1 couche de Brillance Parfaite ou de Fini-Plus et cuire sous la lampe.
Conservation du gel UV Perfection Blanc Parfait
Les pots de gels UV Perfection Blanc Parfait doivent être conservés à l'abri des sources lumineuses, à température ambiante

Brush On Gel Shaper - Modeling Gel 15mL
Brush On Gel is a UV gel system that strengthens and lengthens natural nails. Brush On Gel brushes have short bristles, making it easier to apply the product precisely.
Instructions for use on prosthesis or with form (stencil)
- Perform the preparation of the natural nail;
- Apply a prosthesis or a form (stencil);
- Apply one layer of Brush On Gel Base Coat - Base Gel to the natural nail, then dry for 15 seconds under a universal lamp;
- Apply the Brush On Gel Builder - Sculptor to obtain the desired shape and length if there is a template, then dry for 1 minute under an LED lamp;
- File to shape and remove imperfections, then make sure to remove all traces of dust;
- Apply the Brush On Gel Top Coat, then dry for 30 seconds under an LED lamp.
Instructions for use on natural nails
- Perform the preparation of the natural nail;
- Apply one layer of Brush On Gel Base Coat - Base Gel to the natural nail, then dry for 15 seconds under a universal lamp;
- Apply 2 coats of Brush On Gel Shaper - Modeler to the nail, making sure to seal the tip of the nail well each time and cure each coat for 1 minute under an LED lamp;
- Apply the Brush On Gel Top Coat, then dry for 30 seconds under an LED lamp.
* If desired, use a gel polish before applying the Brush On Gel Top Coat.

Brush On Gel Brush On Gel - Kit complet
Le Brush On Gel, aussi appelé Builder in a bottle, est un système de gel UV qui permet de renforcir l'ongle naturel, tout en permettant d'allonger ce dernier. Les poils des pinceaux des Brush On Gel sont courts, ce qui facilite une application précise du produit.
Ce kit comprend le gel de base, le top, le gel modeleur et le gel sculpteur, 2 blocs et 25 chablons :
- La base gel du Brush On Gel permet de lier efficacement le Brush On Gel afin de permettre une tenue optimale du recouvrement.
- Le Brush On Gel Shaper - Gel Modeleur est un gel rehausseur pour renforcer et protéger l'ongle naturel.
- Le Brush On Gel Builder permet d'allonger les ongles sur formes (chablons) pour une longueur moyenne à longue.
- Le top coat à utiliser comme finition après le recouvrement fait au Brush On Gel.
- Un bloc jaune et un bloc blanc
- Un paquet de 50 chablons pour faire vos extensions
Mode d'emploi du Brush-on Gel sur prothèse ou avec forme (chablon) pour allonger l'ongle
- Effectuer la préparation de l'ongle naturel;
- Appliquer une prothèse ou une forme (chablon);
- Appliquer une couche de Brush On Gel Base Coat - Base Gel sur l'ongle naturel, puis sécher pendant 15 secondes sous une lampe universelle;
- Appliquer le Brush On Gel Builder - Sculpteur afin d'obtenir la forme et la longueur désirée s'il y a un chablon, puis sécher pendant 1 minute sous une lampe LED;
- Limer pour former et retirer les imperfections, puis s'assurer de retirer toutes traces de poussière;
- Appliquer le Brush On Gel Top Coat- Gel de Finition, puis sécher 30 secondes sous une lampe LED.
Mode d'emploi du Brush-on Gel sur ongle naturel sans allongement
- Effectuer la préparation de l'ongle naturel;
- Appliquer une couche de Brush On Gel Base Coat - Base Gel sur l'ongle naturel, puis sécher pendant 15 secondes sous une lampe universelle;
- Appliquer 2 couches de Brush On Gel Shaper - Modeleur sur l'ongle, en s'assurant de bien sceller le bout de l'ongle à chaque fois et sécher chaque couche pendant 1 minute sous une lampe LED;
- Appliquer le Brush On Gel Top Coat- Gel de Finition, puis sécher 30 secondes sous une lampe LED.
* Si désiré, utiliser un vernis gel avant de mettre le Brush On Gel Top Coat - Gel de Finition.
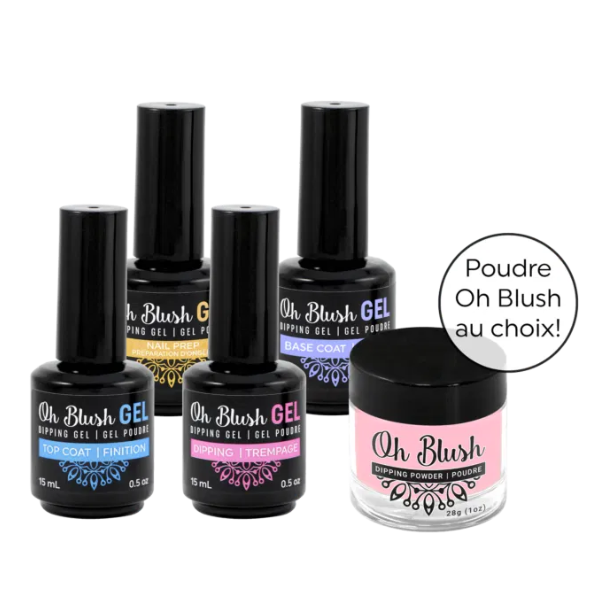
Oh Blush Gel Trial Set including Base, Prep, Dip, Finish and one Oh Blush powder of your choice
The large Oh Blush family is expanding with the GEL range!
Oh Blush gel products allow for quick and easy application!
They are catalyzed in a UV or LED lamp.
They do not require any spray hardener, reducing the risk of allergies and intolerance to spray hardeners or acrylate-based products!
They can be used with all Oh Blush powders and also with all Oh Blush Sparkle powders!
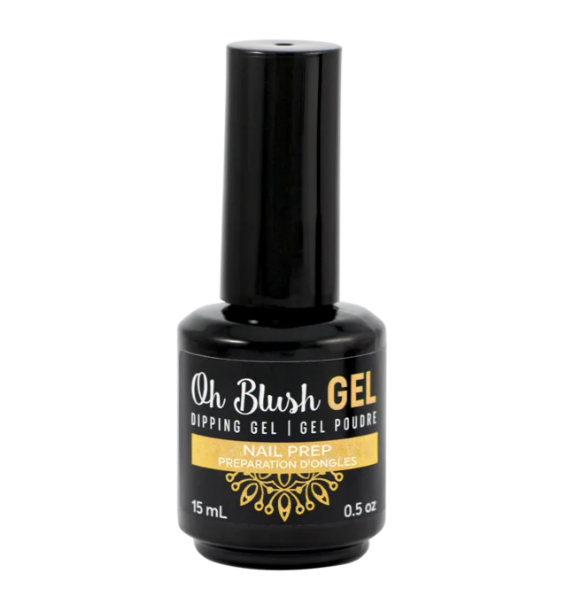
Preparation
- Brush nails with soap and water;
- Push back cuticles and file nails;
- Choose and adjust prostheses (if applicable);
- Run a yellow block over the nail and remove the dust;
- Apply 2 coats of Oh Blush GEL PREP to the nail plate;
- Glue the prosthetics with the Oh Blush DIP BASE & FINISH (if applicable, product sold separately).
Steps for applying the Oh Blush Gel and Powder system
- Apply a very thin layer of Oh Blush GEL BASE and cure for 30 seconds under an 18W LED lamp or for 1 minute under a 36W UV lamp;
- Remove excess with a dry brush;
- Apply a very thin layer of Oh Blush DIP GEL;
- Sprinkle your chosen Oh Blush powder onto the nail, shake off any excess, then smooth out any creases with an orange blossom stick;
- Cure for 1 minute in a 36W UV or 18W LED lamp;
- Repeat steps 1-3 to achieve desired strength and opacity;
- Apply a very thin layer of Oh Blush DIP GEL and cure for 1 minute;
- Remove the stickiness with 99% alcohol;
- File nails to a smooth surface, then remove dust;
- Finish with a coat of Oh Blush GEL FINISH, cure for 2 minutes in a 36W UV lamp or 30 seconds in an 18W LED lamp.
Removing an Oh Blush Gel and Powder Cover
File the nail surface, then soak your nails in Oh Blush NAIL POLISH REMOVER for 5 minutes.
Repeat until all traces of gel powder are gone.
Included in the set:
- Oh Blush GEL BASE
- Oh Blush GEL PREP
- Oh Blush DIP GEL
- Oh Blush GEL FINISH
- 1 Oh Blush Powder of your choice (write your choice in the comments otherwise we will give you a random powder).

Le système hybride unique de Gelous vous permet de profiter du meilleur des deux mondes.
En combinant gel souple et gel dur, il vous offre tous les avantages de chacun, sans leurs inconvénients.
✅ Avantages :
-
Excellente adhérence
-
Résultats professionnels
-
Résistance aux chocs
-
Flexibilité
-
Facilité d’utilisation (seulement 2 produits pour tous types d’ongles)
-
Auto-égalisant
-
Sans odeur
-
Finition cristalline
-
Facile à limer
-
Tenue jusqu’à 35 jours
📦 Le kit contient :
-
Flexi – 7 g (0,25 oz)
-
Sculpt-X – 7 g (0,25 oz)
-
Gelous Vinyl Polish – Gel couleur – 15 ml (0,5 oz)
-
Gelous Nail Armour – 15 ml (0,5 oz)
-
Pinceau de précision Gelous
-
Guide étape par étape
⚠️ Non inclus : Lampe LED (obligatoire pour la catalyse)


Gelish Vernis UV Basix Kit - Kit de Base
Ensemble de format miniature pour le salon. (pH Bond, Base Foundation, Top it Off, Huile à cuticules, Dissolvant)
1. Préparation d'ongles (pH Bond) 9ml
2. Base UV Gelish (Foundation) 9ml
3. Couche de Finition UV (Top it Off) 9ml
4. Huile à cuticules (Nourish) 9ml
5. Dissolvant à vernis 60 ml
6. Nettoyeur pour ongles 60 ml
Aussi inclus dans l'ensemble: bâton de bois d'oranger, petite lime, pousse cuticule en plastique.
Les atouts de la gamme Gelish :
- Pinceau large et plat pour une application facile et impeccable.
- Application aussi simple qu'avec un vernis régulier.
- Vernis durable jusqu'à 3 semaines sans écaillement.
- Peut être utilisé sous la lampe LED ou UV.
Comment appliquer les vernis UV Gelish :
- Procédez à votre préparation d'ongles puis appliquez le pH bond afin d'équilibrer le pH de l'ongle.
- Appliquez la base Foundation puis cuire sous la lampe LED pendant 10 secondes ou 1 minute sous une lampe UV.
- Appliquez deux couches de votre couleur favorite, en faisant cuire chaque couche pendant 30 secondes sous une lampe LED ou 2 minutes sous une lampe UV.
- Appliquez la finition Top It Off puis cuire sous la lampe LED pendant 30 secondes ou 2 minutes sous une lampe UV.
- Retirez l'effet collant à l'aide d'un tampon et du Nettoyeur pour ongles.
- Appliquez l'huile à cuticules nourrissante et massez à la base des cuticules.
Pour le retirer, faites tremper pendant 10 minutes dans un pot éponge avec un dissolvant avec acétone.

Gelish PolyGel Dark Pink Sheer - 60g
A hybrid product between UV gel and acrylic! PolyGel is strong, flexible, lightweight on nails and odorless and residue-free!
PolyGel Dark Pink Sheer - Pink - 60g - Gelish
A hybrid product between UV gel and acrylic! PolyGel is strong, flexible, lightweight on nails, and odorless and residue-free! This product is ideal for both beginners and professionals. It's easy to work with, requires few steps, and the results are impeccable.
PolyGel has the perfect consistency for easy use. No monomer, no ratios, or mixing required! The odorless formula allows you to work as quickly or as slowly as you like. The formula has the same durability as acrylic with a slight gel texture.
One tube of PolyGel allows you to do between 30 and 50 manicures depending on the application.

PolyGel Bright White Opaque - 60g - Gelish
A hybrid product between UV gel and acrylic! PolyGel is strong, flexible, lightweight on nails, and odorless and residue-free! This product is ideal for both beginners and professionals. It's easy to work with, requires few steps, and the results are impeccable.
PolyGel has the perfect consistency for easy use. No monomer, no ratios, or mixing required! The odorless formula allows you to work as quickly or as slowly as you like. The formula has the same durability as acrylic with a slight gel texture.
One tube of PolyGel allows you to do between 30 and 50 manicures depending on the application.

This nail dehydrator can dry out nails and balance their pH. Combined with proper nail prep, pH Bond will greatly increase the hold of a nail.
Can be used with any technique including Polygel.

Gelish Art Form Gel - Essentiel 5g
Couleur: Vert
Catégorie: les essentiels
Les atouts du gel de Gelish :
- Technologie 2D: Définition et Design
- Idéal pour le One Stroke
- Opacité parfaite
- 24 couleurs conçues stratégiquement (les essentiels, les pastels, les néons et les 'effets"
- Mélangez plusieurs pigments pour obtenir d'autres couleurs
- Un pot conçu pour enlever l'excédent de gel pour éviter les gâchis autour du pot
- Pas de coulis
Comment appliquer le Gelish Art Form Gel sur le vernis Gelish :
- Après avoir terminé d'appliquer votre vernis Gelish, utilisez un pinceau et trempez le dans le Gel Art Form Gel.
- Avec l'intérieur du pot prévu à cet effet, enlevez l'excédent du gel sur le pinceau jusqu'à obtenir une quantité désirée
- Créer le design de votre choix
- Cuire 30 sec avec la lampe de Gelish. * Le temps de cuisson peut varieren fonction de la lampe utilisée *
* Le Gelish Art Form Gel s'applique également sur le Polygel de Gelish. Répétez les mêmes étapes que ci-haut.
** Pinceau non inclus **

Gelish Art Form Gel - Essential 5g
Color: Rose Gold Metallic
Category: Essentials
The advantages of Gelish gel:
- 2D Technology: Definition and Design
- Ideal for One Stroke
- Perfect opacity
- 24 strategically designed colors (essentials, pastels, neons and 'effects')
- Mix several pigments to obtain other colors
- A pot designed to remove excess gel to avoid mess around the pot
- No grout
How to apply Gelish Art Form Gel over Gelish polish:
- After you've finished applying your Gelish polish, use a brush and dip it into the Gel Art Form Gel.
- Using the inside of the pot provided for this purpose, remove the excess gel on the brush until you obtain the desired quantity.
- Create the design of your choice
- Cook for 30 seconds with the Gelish lamp. *Cooking time may vary depending on the lamp used*
*Gelish Art Form Gel can also be applied over Gelish Polygel. Repeat the same steps as above.
** Brush not included **

Gelish Art Form Gel - Pastel Dark Pink 5g
Color: Pink
Category: Essentials
The advantages of Gelish gel:
2D Technology: Definition and Design
Ideal for One Stroke
Perfect opacity
24 strategically designed colors (essentials, pastels, neons and 'effects')
Mix several pigments to obtain other colors
A pot designed to remove excess gel to avoid mess around the pot
No grout
How to apply Gelish Art Form Gel over Gelish polish:
After you've finished applying your Gelish polish, use a brush and dip it into the Gel Art Form Gel.
Using the inside of the pot provided for this purpose, remove the excess gel on the brush until you obtain the desired quantity.
Create the design of your choice
Cook for 30 seconds with the Gelish lamp. *Cooking time may vary depending on the lamp used*
*Gelish Art Form Gel can also be applied over Gelish Polygel. Repeat the same steps as above.
** Brush not included **

Gelish Art Form Gel - Essential 5g
Color: Metallic Silver
Category: Essentials
The advantages of Gelish gel:
- 2D Technology: Definition and Design
- Ideal for One Stroke
- Perfect opacity
- 24 strategically designed colors (essentials, pastels, neons and 'effects')
- Mix several pigments to obtain other colors
- A pot designed to remove excess gel to avoid mess around the pot
- No grout
How to apply Gelish Art Form Gel over Gelish polish:
- After you've finished applying your Gelish polish, use a brush and dip it into the Gel Art Form Gel.
- Using the inside of the pot provided for this purpose, remove the excess gel on the brush until you obtain the desired quantity.
- Create the design of your choice
- Cook for 30 seconds with the Gelish lamp. *Cooking time may vary depending on the lamp used*
*Gelish Art Form Gel can also be applied over Gelish Polygel. Repeat the same steps as above.
** Brush not included **


Reflective Glitter Spider Gel
8ml pots
Choice of 7 Colors: Gold, Blue, Red, Green, Lime Green, Purple, Gray
Cured: UV/LED lamp
How to use:
1. Apply a thin layer of color gel and cure under LED/UV lamp. (Repeat this step to achieve the desired effect)
2. Use a dotter to apply the appropriate amount of spider drawing gel.
3. Apply the clear top coat and cure for 30 seconds under LED lamp, or 2 minutes under UV lamp.
Showing 330/400
Next